Thermometer
is a temperature measuring instrument. There are different principles
that can be used to measure the temperature like thermal expansion of
solids or liquids, pressure of gas, measurement of infrared energy etc.
Based
on the principle used, the construction and functioning of the
thermometer can change but ultimately it ends up measuring the
temperature. Thermometers are used in industries, weather studies,
medicinal field and scientific research.
Measuring temperature is an important part of many applications.
Maintaining precise temperatures in storage rooms, laboratories,
incubators, etc. is of high priority.
For all the above mentioned and many more applications, thermometers are often used to measure the temperature.
There are different types of thermometers available for different
purposes. The most commonly found thermometer is a medical or clinical
thermometer, which is a mercury in glass type thermometer.
They are used to measure the temperature of human body and is an
example of an analogue thermometer. Now a days, the use of digital
thermometers is increasing as they are accurate and safe to use.
In this project, an Arduino based digital thermometer is designed that can be used to monitor the temperature of room.
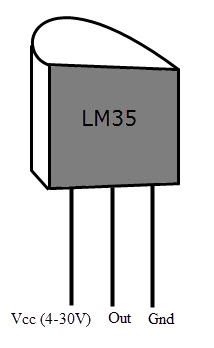
LM35 is a precision centigrade temperature sensor. The output voltage
of the sensor is directly proportional to the temperature in
centigrade. LM35 can be used in the range of -550C to +1500C with +/- 0.750C accuracy.
At room temperature, the accuracy is +/- 0.250C. The output voltage of LM35 changes at 10 mV /0C i.e. for every 10C
change in temperature, the output voltage changes at +/- 10 mV. LM35 is
a 3 pin IC and the figure depicting the pins is shown below.
A similar precision temperature sensor is LM34 that can be used to
measure temperature in Fahrenheit. It can be used to get the temperature
directly in Fahrenheit.
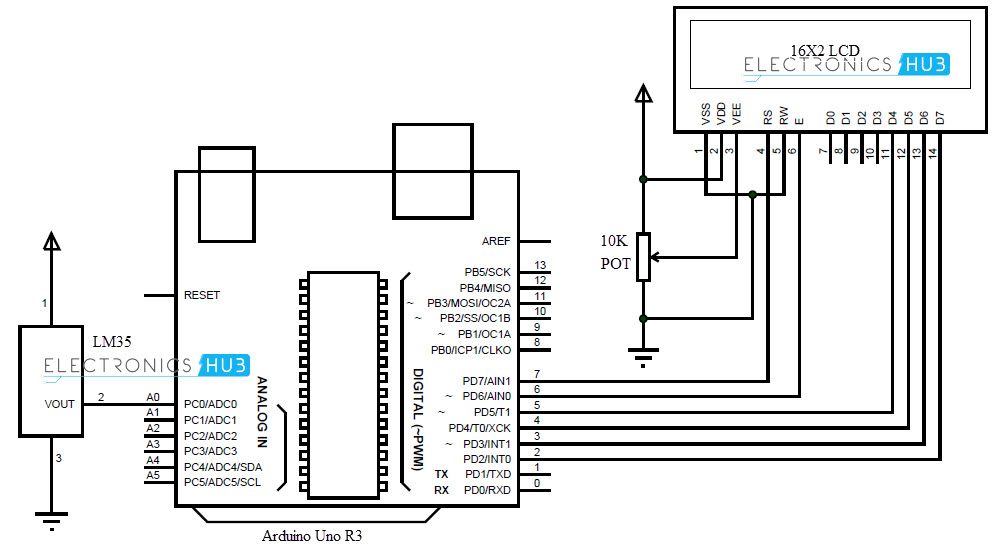
Circuit Design of Digital Thermometer
LM35 is the temperature sensor used in this project. The output of
the sensor is directly proportional to the temperature but in analogue
form. Hence, the output of LM35 i.e. pin 2 is connected to analog input
A0 of Arduino.
As it is a digital thermometer, we need to convert the analogue
values to digital and display the result on a display like LCD. We used a
16X2 LCD in this project. Pins 1 and 2 of LCD are connected to ground
and supply respectively.
In order to control the contrast of the display, Pin 3 of LCD is
connected to the wiper of a 10 KΩ POT. The other terminals of POT are
connected to supply and ground. Pins 15 and 16 of LCD are used to turn
the backlight of the LCD.
They are connected to supply and ground respectively. In order to
display the information on LCD, we need 4 data pins of the LCD. Pins 11 –
14 (D4 – D7) are connected to Pins 5 – 2 of Arduino. Pins 4, 5 and 6
(RS, RW and E) of LCD are control pins.
Pins 4 (RS) of LCD is connected to pin 7 of Arduino. Pin 5 (RW) is
connected to ground. Pin 6 (E) is connected to pin 6 of Arduino.
Working
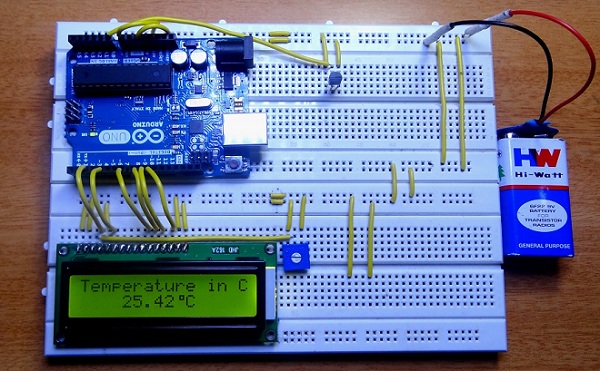
A high precision digital thermometer is designed in this project. It
is constructed with simple components like Arduino, LM35 temperature
sensor and an LCD display. The working of the circuit is very simple and
is explained below.
The temperature sensor i.e. LM35 continuously monitors the room
temperature and gives an analogue equivalent voltage which is directly
proportional to the temperature.
This analogue data is given to Arduino through A0. As per the code
written, the Arduino converts this analogue voltage value to digital
temperature readings. This value is displayed on the LCD.
The rate of change of temperature capture can be programmed in the
code. The output displayed on the LCD is an accurate reading of room
temperature in centigrade.
Code
#include<LiquidCrystal.h>
LiquidCrystal lcd(7,6,5,4,3,2);
const int Sensor = A0;
byte degree_symbol[8] =
{
0b00111,
0b00101,
0b00111,
0b00000,
0b00000,
0b00000,
0b00000,
0b00000
};
void setup()
{
pinMode(Sensor, INPUT);
lcd.begin(16,2);
lcd.createChar(1, degree_symbol);
lcd.setCursor(0,0);
lcd.print(" Digital ");
lcd.setCursor(0,1);
lcd.print(" Thermometer ");
delay(4000);
lcd.clear();
}
void loop()
{
float temp_reading=analogRead(Sensor);
float temperature=temp_reading*(5.0/1023.0)*100;
delay(10);
lcd.clear();
lcd.setCursor(0,0);
lcd.print("Temperature in C");
lcd.setCursor(4,1);
lcd.print(temperature);
lcd.write(1);
lcd.print("C");
delay(1000);
}
Note
This project can be used to monitor temperature of a room with in a range of -550C to +1500C with very accurate readings.
The temperature sensor used (LM35) is a precision centigrade
temperature sensor. If the readings of the temperature are required in
Fahrenheit, then either Fahrenheit temperature sensor (LM34) can be used
or simply modify the code for converting Centigrade to Fahrenheit.
The thermometer can be powered by a 9V battery making it a portable
device that can be easily moved between different rooms or locations.
Can be used in transportation vehicles to determine the icing conditions of the road.
Based on the readings of the thermometer, the air conditioning
systems, heating and cooling systems can be controlled either manually
or automatically.
I got some helpful knowledge from this post. Thankful to you for sharing an article like this. I'll try this fluke laser thermometer and hope it can help!
More and more makerspaces around the world are looking to add coding and electronics to their maker education programs. One of the best ways to do this is by integrating an Arduino board into makerspace projects and lessons. We’ve found that a lot of maker educators haven’t taken the plunge into coding or Arduino because they think programming is scary. Because of this, we wanted to make sure this tutorial was written for the absolute beginner with no experience whatsoever. This tutorial is a high level view of all the parts and pieces of the Arduino ecosystem. In future posts, we will take you step by step in creating your first simple Arduino project. What Is Arduino? Arduino is an open source programmable circuit board that can be integrated into a wide variety of makerspace projects both simple and complex. This board contains a microcontroller which is able to be programmed to sense and control objects in the physi...
GSM Based Home Security Alarm System Using Arduino Home Security Systems are an important feature of modern residential and office setups. Home security systems must be affordable, reliable and effective. Modern complex home security systems include several security features like fire, intruders, electronic door lock, heat, smoke, temperature, etc. Some security systems may be a combination of all the security measures. Such complex systems may be expensive and may not be affordable by everyone. There are individual security systems based on the requirement. In this project, we designed a simple but very efficient home security that has a function of calling the homeowner on his/her mobile number in case of an intruder alert. Help us in selecting the next DIY Arduino Project. : Select your Favourite Project » The project is based on Arduino, PIR motion detection sensor and GSM Module. Table of Contents Circuit Diagram Hardware Required Circuit ...
Arduino Solar Tracker In modern solar tracking systems, the solar panels are fixed on a structure that moves according to the position of the sun. Let us design a solar tracker using two servo motors, a light sensor consisting of four LDRs and Arduino UNO board. Table of Contents Circuit Diagram Components Required Working Setup Project Code Circuit Diagram The circuit design of solar tracker is simple but setting up the system must be done carefully. Four LDRs and Four 100KΩ resistors are connected in a voltage divider fashion and the output is given to 4 Analog input pins of Arduino. The PWM inputs of two servos are given from digital pins 9 and 10 of Arduino. Components Required Arduino UNO [ Buy Here ] Servo Motor [ Buy Here ] Light Sensors LDR Resistors Working LDRs are used as the main light sensors. Two servo motors are fixed to the structure that holds the solar panel. The program for Arduino is uploaded to the microcontroller. Th...


I got some helpful knowledge from this post. Thankful to you for sharing an article like this. I'll try this fluke laser thermometer and hope it can help!
ReplyDelete